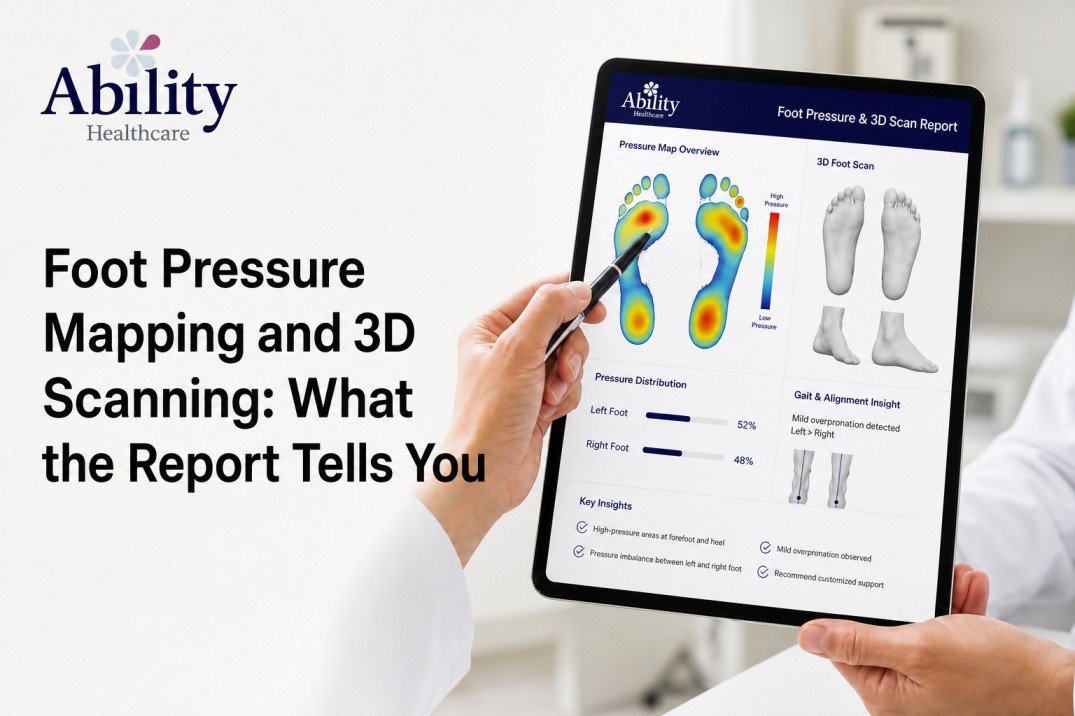
You stand on a glass plate, walk across a mat a few times, and a minute later someone hands you a printout covered in red, orange, green and blue patches with numbers along the side.
Most people nod politely and have no idea what they are looking at.
That is a shame, because the report is genuinely readable once you know what the colours and the numbers mean. It tells you where your foot is being overloaded, whether your arch is doing its job, whether your left and right sides are working evenly, and in the case of a diabetic patient, exactly where an ulcer is most likely to form months before it does.
This guide explains what each part of the report means, so that the next time you have a scan you can follow the conversation rather than just receive it.
What Is Foot Pressure Mapping?
Foot pressure mapping, also called plantar pressure analysis or pedobarography, measures how force is distributed across the sole of your foot while you stand and walk.
The equipment is a plate or mat containing thousands of small pressure sensors. As your foot loads onto it, each sensor records how much force it is carrying and at what moment in the step. Software then converts those thousands of readings into a colour image of your foot and a set of numbers.
A foot pressure test answers a question that looking at a foot cannot. Two people can have feet that appear identical, and load them in completely different ways. Pressure mapping shows the loading, which is what actually causes tissue damage over time.
How the Foot Scan Machine Works
A computerised foot scan typically involves three parts:
- A pressure platform. A rigid plate you stand on or step onto, with high sensor density for detailed readings.
- A pressure walkway. A longer mat you walk across to capture pressure during real walking.
- Analysis software. This assembles the frames into a gait cycle and calculates the measurements that appear on your report.
The whole assessment usually takes fifteen to thirty minutes. It is painless, involves no radiation, and requires nothing more than bare feet and comfortable clothing.
Static vs Dynamic Foot Analysis
Your report will usually contain both, and they answer different questions.
Static analysis is taken while you stand still. It shows how your body weight is distributed when you are not moving: left versus right, forefoot versus heel, and the basic shape of your arch under load. It is quick and useful for establishing a baseline.
Dynamic analysis is taken while you walk. It shows the sequence of loading through a step, from heel contact to toe-off, and reveals problems that standing still hides completely.
This distinction matters more than most patients realise. Plenty of people have a perfectly normal-looking arch while standing and a collapsing one the moment they walk. If a clinic offers only a static scan, you are seeing half the picture. Ask for dynamic.
3D Foot Scanning: A Different Job Entirely
3D foot scanning and pressure mapping are often done in the same appointment and are frequently confused, but they measure different things.
Pressure mapping measures force. It tells you what is happening. 3D scanning measures shape. It captures the exact three-dimensional geometry of your foot, including arch height, foot length and width, heel shape and any deformity, usually to sub-millimetre accuracy.
You need both to make a proper orthotic. The pressure map tells the orthotist what the insole must correct. The 3D scan tells them the precise shape it must be built to. The scan file goes into design software, the correction is applied, and the insole is milled or 3D printed from that data.
This is the difference between a genuinely custom device and one selected from a size chart.
How to Read a Foot Pressure Map
Here is the part most reports never explain.
Foot Pressure Map Colours Meaning
Nearly all systems use a heat map, and the scale runs the same way regardless of manufacturer.
| Colour | Pressure level | What it usually indicates |
| Red | Highest | Peak loading, the area under most stress |
| Orange / yellow | High to moderate-high | Significant weight bearing |
| Green | Moderate | Normal, healthy loading |
| Light blue | Low | Minimal contact |
| Dark blue / white | Very low or none | Area not touching the ground |
What does red mean on a foot scan? It marks the area carrying the highest pressure during your step. Some red is completely normal, particularly under the heel and the ball of the foot, since these are designed to take load. What matters is whether the red appears where it should, how large it is, and whether it matches on both feet.
Red under the heel and under the first and second metatarsal heads is expected. Red under the middle of the arch, on the outer border, or concentrated under a single toe is not, and usually explains why something hurts.
Normal Foot Pressure Distribution
In a healthy foot, load moves through the step in a predictable sequence:
- Heel strike loads the outer rear of the heel
- Weight moves forward along the outer border of the foot
- Load transfers across the ball of the foot from outside to inside
- Push-off occurs through the first and second toes
Broad guidance for a normal distribution is roughly 60 percent of load through the rearfoot and 40 percent through the forefoot, with the midfoot carrying relatively little. The arch region should show green or blue, not red.
The Centre of Pressure Line
Your report will show a curved line running from heel to toe. This is the centre of pressure, sometimes called the gait line, and it traces the path of the average point of force through your step.
- A smooth, gently curving line ending near the first and second toes suggests efficient mechanics.
- A line that swings sharply inward in the midfoot suggests overpronation, where the arch is collapsing inward.
- A line staying along the outer border suggests supination, where the foot is not rolling inward enough to absorb shock.
- An irregular or zigzag line often indicates instability, pain avoidance or a balance problem.
For diabetic and elderly patients, the centre of pressure line is also a balance indicator, and a very variable line can signal fall risk.
Arch Index Meaning
The arch index is a single number describing your arch type, calculated from the proportion of the total footprint area taken up by the midfoot.
| Arch index | Interpretation |
| Below 0.21 | High arch (pes cavus) |
| 0.21 to 0.26 | Normal arch |
| Above 0.26 | Low arch or flat foot (pes planus) |
Exact cut-offs vary slightly by system, so read the value against the reference range printed on your own report rather than against numbers from the internet.
Foot Posture Index Interpretation
The Foot Posture Index, or FPI-6, is a clinical scoring system rather than a machine output. Your clinician assesses six features of your standing foot and scores each from minus two to plus two, giving a total between minus twelve and plus twelve.
- Minus 12 to minus 5: highly supinated
- Minus 4 to 0: supinated
- 0 to plus 5: neutral
- Plus 6 to plus 9: pronated
- Plus 10 to plus 12: highly pronated
It is included because it captures things a pressure plate cannot see, such as bone position and soft tissue bulge. Where the FPI and the pressure map agree, confidence in the finding is high.
Pressure-Time Integral
Peak pressure tells you how hard an area was loaded. The pressure-time integral tells you how hard and for how long, combined.
This is arguably the more important number for tissue damage, and it is the one most patients ignore. A moderate pressure sustained across most of the step can damage tissue more than a brief spike. In diabetic foot assessment, a high pressure-time integral under a metatarsal head is a stronger warning sign than peak pressure alone.
Left Versus Right
Always compare your two feet. Differences of more than about ten percent in total load, contact time or peak pressure suggest asymmetry, which may come from leg length difference, an old injury, hip or knee problems, or pain on one side changing how you walk.
Asymmetry is often the finding that explains a problem somewhere else entirely, such as one-sided knee or lower back pain.
What the Report Reveals About Flat Feet
Flat feet treatment decisions should be based on what the foot does under load, not on how it looks.
On a pressure map, a flat foot typically shows:
- A wide midfoot contact area with green or yellow where there should be blue
- An arch index above 0.26
- A centre of pressure line deviating inward
- Higher pressure under the inner forefoot and the first toe
- A positive Foot Posture Index score
Flat feet in children need careful interpretation. Almost all young children have flat feet, because the arch develops gradually and is often not fully formed until around age six to eight. A flexible flat foot that forms an arch when the child stands on tiptoe, with no pain and normal activity, usually needs monitoring rather than treatment. A rigid flat foot, pain, rapid fatigue, or a child avoiding activity does warrant assessment. The NHS guidance on flat feet sets out when to seek advice.
Flat feet problems in adults are a different matter. Adult acquired flat foot, often from posterior tibial tendon dysfunction, tends to be progressive. Symptoms include arch and inner ankle pain, fatigue after standing, and the heel drifting outward.
Can flat feet be corrected in adults? Honestly, the bone structure of a rigid adult flat foot cannot be restored by an insole. What orthotic support does achieve, and this is worth being clear about, is redistributing load away from painful areas, reducing strain on the posterior tibial tendon and plantar fascia, improving walking efficiency, and slowing progression. That is symptom control and protection, not correction. Any clinic promising to fix adult flat feet with an insole is overselling.
What the Report Reveals About High Arch Feet Problems
A high arch, or pes cavus, produces the opposite pattern: very little midfoot contact, an arch index below 0.21, and pressure concentrated into two small areas under the heel and the ball of the foot.
Because the load is squeezed into a smaller contact area, peak pressures run higher. This is why high arch feet problems commonly include metatarsalgia, callus under the ball of the foot, lateral ankle instability, stress fractures and heel pain.
The orthotic goal here is not arch support in the usual sense. It is increasing total contact area and cushioning so that force is spread across more tissue rather than concentrated on two points.
Plantar Fasciitis, Heel Pain and Arch Pain
Plantar fasciitis treatment is one of the most common reasons people are referred for a scan, and the report is useful for a specific reason: it shows the mechanical cause rather than just the painful site.
Typical findings include high heel pressure, prolonged midfoot loading suggesting the arch is flattening excessively during stance, and an inward-deviating centre of pressure line. Each of these increases tension in the plantar fascia through the step.
Effective heel pain treatment and arch pain treatment usually combine several things: calf and fascia stretching, load management, appropriate footwear, and orthotic support that reduces fascial strain. The scan is what tells the clinician which correction is needed and how much, rather than guessing.
Diabetic Foot Screening: The Most Important Use of a Foot Pressure Test
If there is one section of this article that matters most, it is this one.
Diabetic neuropathy removes the protective pain sensation that would normally make you shift your weight or change your shoes. A patient with neuropathy can walk on a damaging pressure point all day and feel nothing at all. Tissue breaks down, an ulcer forms, and ulcers are the pathway to most diabetes-related amputations.
A foot pressure test for diabetes identifies the high-risk areas before the skin breaks. This is genuine prevention, not just diagnosis.
Diabetic foot screening using pressure mapping looks for:
- Peak pressure above the recognised risk threshold under any metatarsal head
- A high pressure-time integral in a single area
- Loss of the normal loading sequence
- Reduced total contact area
- Asymmetry between feet
- Pressure concentrated under an existing callus, which is often the site where an ulcer will form
Diabetic foot ulcer prevention then follows from the map. Offloading insoles for diabetic foot care are designed to redistribute load away from the identified high-pressure zones, using softer materials under those specific areas and firmer support elsewhere. Combined with appropriate footwear, this is one of the most effective preventive measures available.
Practical steps on how to prevent diabetic foot ulcers:
- Check both feet daily, including between the toes and the soles, using a mirror if needed
- Never walk barefoot, indoors or outdoors
- Have calluses professionally debrided rather than cutting them yourself
- Wear properly fitted footwear with adequate depth
- Keep blood glucose within your target range
- Have a professional foot examination at least annually, more often if you have neuropathy or a previous ulcer
- Report any redness, blister, crack or warm area immediately
The National Institute of Diabetes and Digestive and Kidney Diseases provides detailed guidance on daily foot care, and the International Working Group on the Diabetic Foot publishes the international clinical guidelines used worldwide.
Charcot Foot
Charcot foot is a serious complication in which bones in the neuropathic foot weaken and can fracture and collapse, often without significant pain. Early signs are a foot that is warm, red and swollen, frequently mistaken for infection. Pressure mapping shows a dramatically altered loading pattern, commonly a rocker-bottom shape with very high midfoot pressure.
If your foot is unusually warm and swollen and you have diabetes, treat it as urgent and seek medical assessment the same day. Early Charcot foot is treatable. Late Charcot foot often is not.
Running Gait Analysis and Foot Strike Pattern
For runners, running gait analysis using pressure mapping adds objective data to what is usually guesswork.
Foot strike pattern analysis identifies whether you land on the heel, the midfoot or the forefoot, and how load transfers from there. None of these is universally correct, but each places load on different tissues, and a mismatch between your strike pattern and your training volume is a common source of injury.
The report also shows loading rate, which correlates with impact-related injury risk, and left-right asymmetry, which frequently appears after an old injury and predicts where the next one will occur.
Useful for shoe selection, training adjustment and recurring injuries that have not responded to rest.
From Report to Custom Orthotic Insoles
The report is only worth having if something follows from it.
Custom orthotic insoles are designed from your specific pressure map and 3D scan. The design process posts the foot to correct alignment where appropriate, adds cushioning to the identified high-pressure zones, supports the arch to the height your scan shows rather than a generic height, and accommodates any deformity captured by the scan.
Arch support insoles bought off the shelf are not the same thing. They are useful for mild symptoms and are considerably cheaper, and an honest clinic will tell you when they are enough. They come in a fixed set of arch heights, cannot offload a specific point, and cannot accommodate deformity.
Orthotic insoles for flat feet need to control the rate of arch collapse without blocking natural movement, which requires knowing how much collapse is occurring. That number comes from the scan.
Medical grade insoles differ from retail products in the materials used, the density zoning across the insole, durability under daily load, and the fact that they are made to a clinical prescription and reviewed after fitting.
Expect an adaptation period. Most people wear new orthotics for one to two hours on the first day and build up over one to two weeks. Some initial awareness or mild aching in new areas is normal. Sharp pain, blistering or numbness is not, and means the device needs adjusting.
Foot Pressure Test Cost and Insole Pricing
Indicative ranges for India:
| Service | Indicative cost |
| Basic static foot scan | ₹500 to ₹1,500 |
| Foot pressure test cost (static and dynamic) | ₹1,000 to ₹3,000 |
| Full gait analysis cost in India with report and consultation | ₹2,000 to ₹6,000 |
| Off the shelf arch support insoles | ₹800 to ₹3,000 |
| Semi-custom insoles | ₹3,000 to ₹7,000 |
| Fully custom medical grade insoles | ₹6,000 to ₹18,000 |
| Diabetic insoles price in India (offloading) | ₹4,000 to ₹15,000 |
Foot scan price in Lucknow and orthotic insoles price in Lucknow at our centre depend on whether you need a static or full dynamic assessment and on the insole specification. Many clinics, including ours, waive or adjust the scan fee when insoles are ordered from the same assessment. Ask before booking.
One caution worth stating plainly. A free foot scan offered at a shoe shop is a sales tool, not a clinical assessment. It typically produces a static image and a recommendation to buy that retailer’s insole. That is not the same as a dynamic assessment interpreted by a qualified orthotist against your medical history.
पैरों का स्कैन: रिपोर्ट क्या बताती है?
पैरों का स्कैन एक ऐसी जाँच है जिसमें एक विशेष प्लेट पर खड़े होकर और चलकर यह मापा जाता है कि आपके पैर के तलवे पर वज़न कहाँ कहाँ पड़ रहा है। रिपोर्ट में लाल रंग सबसे ज़्यादा दबाव वाली जगह दिखाता है, हरा सामान्य दबाव, और नीला वह हिस्सा जहाँ बहुत कम वज़न पड़ता है।
पैर के तलवे में दर्द का कारण अक्सर यही होता है कि किसी एक जगह पर ज़रूरत से ज़्यादा दबाव पड़ रहा है। स्कैन से यह साफ़ दिखता है कि दर्द क्यों हो रहा है, सिर्फ़ यह नहीं कि कहाँ हो रहा है।
एड़ी का दर्द का इलाज करने से पहले यह जानना ज़रूरी है कि एड़ी पर दबाव क्यों बढ़ा हुआ है। ज़्यादातर मामलों में मेहराब (arch) के बैठ जाने से प्लांटर फेशिया पर खिंचाव बढ़ता है। सही इनसोल, स्ट्रेचिंग और सही जूते मिलकर इसमें बहुत राहत देते हैं।
चपटे पैर का इलाज बच्चों और बड़ों में अलग होता है। छोटे बच्चों में चपटे पैर आम बात है और आमतौर पर उम्र के साथ ठीक हो जाते हैं। बड़ों में अगर दर्द या थकान हो, तो कस्टम इनसोल से दबाव को सही तरीके से बाँटा जा सकता है।
मधुमेह में पैरों की देखभाल सबसे ज़रूरी है। शुगर के मरीज़ों में नसों की संवेदना कम हो जाती है, इसलिए घाव बनने पर दर्द महसूस नहीं होता। फुट प्रेशर स्कैन से पहले ही पता चल जाता है कि किस जगह घाव बनने का ख़तरा है, और वहाँ से दबाव हटाने वाले इनसोल बनाए जा सकते हैं। रोज़ अपने दोनों पैर देखें और कभी नंगे पैर न चलें।
Frequently Asked Questions
How long does a foot pressure test take?
Fifteen to thirty minutes including both static and dynamic assessment. The report is usually explained in the same appointment.
Is foot pressure mapping painful or does it use radiation?
Neither. You simply stand and walk on a sensor plate. There is no radiation and nothing is attached to you.
How do I know if my foot scan report is normal?
Look for green or blue in the arch, red confined to the heel and the ball of the foot, a smooth centre of pressure line ending near the first and second toes, an arch index between 0.21 and 0.26, and reasonable symmetry between feet. Your clinician should walk you through each of these.
Do I need custom insoles or will off the shelf work?
For mild symptoms and a normal foot shape, off the shelf arch supports may help but Custom devices are warranted when you have diabetes with neuropathy, a specific high-pressure point needing offloading, significant deformity, or symptoms that have not responded to retail insoles.
How often should the scan be repeated?
Annually for most people with orthotics, and every six months for diabetic patients with neuropathy or a history of ulceration. Repeat sooner if symptoms change.
Can children have a foot scan?
Yes, and it is useful when a child has pain, tires quickly, avoids activity or walks in an unusual way. For a painless flexible flat foot in a young child, monitoring is often all that is needed.
Getting Your Own Scan
If you have persistent heel or arch pain, feet that tire quickly, uneven shoe wear, recurring running injuries, or diabetes with any loss of sensation, a foot pressure assessment is worth having.
Bring your usual footwear, including the pair you wear most, and any previous insoles. Shoe wear patterns tell an experienced orthotist a surprising amount, and they will be read alongside your scan.
Ability Healthcare provides foot assessment and custom orthotic services across Uttar Pradesh, with centres in Lucknow, Azamgarh, Bareilly and Gorakhpur.
This article is for general information and does not replace individual medical advice. Reference ranges vary between measurement systems, so interpret your own report against the values printed on it and with your clinician. Prices are indicative as of September 2026. If you have diabetes and notice any change in your feet, seek medical advice promptly.